Test a chainsaw coil by removing the spark plug, reconnecting it to the ignition lead, grounding it against the engine, and pulling the starter cord to check for a strong blue spark. For accuracy, use a multimeter to measure coil resistance against manufacturer specifications.
Understand How a Chainsaw Coil Works
The chainsaw coil functions as the heart of your chainsaw’s ignition system. Before attempting to test your chainsaw coil, understanding how it works will help you diagnose problems more effectively.
What the ignition coil does
The ignition coil (also called a magneto) serves a crucial purpose – it converts low voltage into the high voltage needed to create a spark. Essentially, it’s an electrical transformer with two sets of wire windings wrapped around an iron core. When your chainsaw is operating, the coil generates between 10,000 and 20,000 volts – enough electrical energy to jump across the spark plug gap and ignite the fuel-air mixture in the combustion chamber.
Unlike car engines that use batteries, chainsaws generate their own electricity through a self-contained system. The ignition coil stores electrical energy momentarily, then amplifies it dramatically before sending it to the spark plug. Without this voltage amplification process, your chainsaw simply cannot start or run properly.
How it connects to the flywheel and spark plug
The physical setup of the ignition system involves several interconnected components:
- Flywheel connection: The ignition coil is mounted in the fan housing directly above the flywheel. The flywheel, attached to the crankshaft, contains permanent magnets. As you pull the starter cord, the flywheel rotates, causing these magnets to pass by the ignition coil.
- Magnetic field generation: When the magnets on the rotating flywheel pass near the coil, they create a changing magnetic field that induces current in the primary winding. This process follows the principle of electromagnetic induction.
- Spark plug connection: The secondary winding of the coil connects to the spark plug via the spark plug wire. This wire carries the high-voltage pulse from the coil to the spark plug.
The timing of this system is precisely coordinated. As the flywheel spins, the magnets pass the coil, generating a small electrical current. This current is then amplified in the secondary coil, producing the powerful spark needed at exactly the right moment in each engine cycle. Consequently, when the ignition coil fails, the spark weakens or disappears completely, leaving you with a chainsaw that won’t start or runs poorly.
Common Signs of a Faulty Coil
Recognizing the warning signs of a failing ignition coil can save you time and frustration with your chainsaw. These telltale symptoms typically appear before complete failure, giving you a chance to address the issue early.
Chainsaw won’t start
A chainsaw that refuses to start is often your first indication of coil problems. When the ignition coil fails, it cannot produce the necessary voltage to create a spark, making starting impossible. You might pull the starter rope repeatedly without any sign of the engine catching. Furthermore, some chainsaws with faulty coils may occasionally start when cold but refuse to restart once warm. This happens because coil problems frequently worsen as the component heats up. Additionally, you might notice the engine turning over normally, indicating that mechanical components are functioning, yet it never ignites.
Weak or no spark at the plug
The most direct evidence of a coil issue is spark quality. A healthy ignition system produces a strong, blue spark when tested. Alternatively, a failing coil might produce a weak, yellow spark or none at all. Sometimes, you may see a visible spark when testing, yet the chainsaw still won’t start because the spark lacks sufficient amperage to ignite the fuel mixture properly. To identify this problem, perform a simple visual spark test by removing the spark plug, reconnecting it to the spark plug wire, and placing the threaded part against the engine while pulling the starter.
Engine stalls or misfires
Perhaps most frustrating are the intermittent problems associated with deteriorating ignition coils. Your chainsaw might run well initially, then suddenly lose power or stall after operating for about 10 minutes. Subsequently, it becomes difficult to restart until the engine cools down. Likewise, the saw might misfire or hesitate when cutting through thick wood, especially under load. Rough idling is another common symptom – the engine runs unevenly at idle speed and may unexpectedly quit. These problems typically worsen over time as the coil continues to deteriorate.
How to Test a Chainsaw Coil Without Special Tools
Testing your chainsaw coil doesn’t require expensive diagnostic equipment. With basic household tools, you can determine whether your ignition coil needs replacement in just minutes. Following these simple steps will help you identify coil issues with confidence.
Step 1: Remove the spark plug and inspect
First, locate and remove the spark plug using a socket wrench. Examine the spark plug for signs of damage, carbon buildup, or oil fouling. A damaged or dirty spark plug might mimic coil issues. Look for cracks in the porcelain insulator or excessive electrode wear. Furthermore, check the electrode gap to ensure it meets manufacturer specifications.
Step 2: Perform a manual spark test
To verify if your coil produces a spark:
- Reconnect the spark plug boot to the removed spark plug
- Place the threaded part of the spark plug against the engine’s metal surface
- Pull the starter cord rapidly
Watch closely – a healthy ignition system produces a strong, blue spark jumping between the electrodes. A weak yellow spark or no spark indicates potential coil issues. For safety, hold only the insulated boot, never touch the metal part during testing.
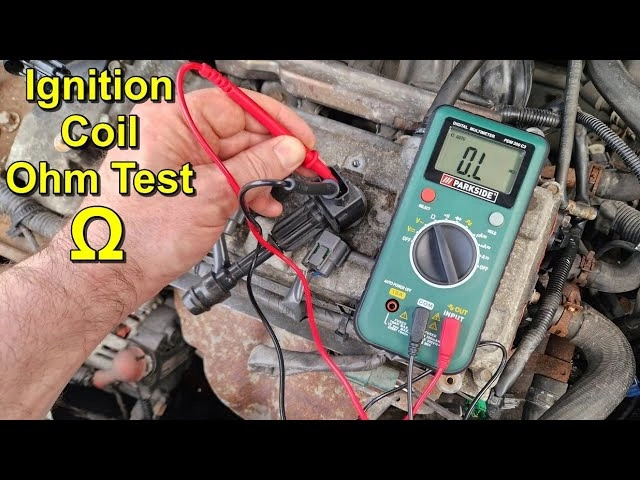
Step 3: Use a multimeter to check resistance
Set your multimeter to measure ohms (Ω). For primary winding testing:
- Disconnect the spark plug wire from the coil
- Touch one probe to the coil’s primary terminal and the other to ground
- Record the reading
For secondary winding:
- Place one probe into the spark plug boot where it connects to the spark plug
- Touch the other probe to ground
- Note this reading as well
Step 4: Compare readings with standard values
Primary winding resistance typically ranges between 0.2-3.0 ohms. Secondary winding should read between 6,000-12,000 ohms though some models vary. Stihl coils generally read about 1.5 ohms primary and 10,000 ohms secondary. Readings significantly outside these ranges suggest coil failure.
Step 5: Check wiring and connections
Inspect all wiring for damage. Look for frayed wires, melted insulation, or loose connections. Check the kill switch wire – sometimes this causes the same symptoms as a bad coil. Ensure all connections are clean and tight. Occasionally, simply cleaning connections solves apparent coil issues.
What to Do If the Coil Fails the Test
After discovering a faulty chainsaw coil through testing, replacement becomes necessary. Instead of rushing to a repair shop, this process can be handled at home with basic tools.
How to find a compatible replacement
Once you’ve confirmed coil failure, locate your chainsaw’s model number, typically found on the housing. Search for replacement coils specifically designed for your model. OEM (Original Equipment Manufacturer) coils offer reliable quality, albeit at higher prices. Aftermarket alternatives, including some Chinese-made options, may cost less and sometimes include extras like pre-installed spark plug caps. Compare resistance specifications with your original coil to ensure compatibility.
Steps to remove and install a new coil
To replace your faulty coil:
- Disconnect the spark plug wire and remove the engine housing cover
- Take off the starter assembly to access the coil
- Unscrew the mounting screws holding the coil
- Disconnect any connected wires, noting their positions
- Clean the mounting area thoroughly before installing the new coil
Setting the correct air gap
The air gap—space between coil and flywheel—requires precise adjustment:
- Typical measurements range from 0.010″ to 0.014″ inches
- Some older models may specify gaps as small as 0.006″
- Without a feeler gage, a twice-folded sheet of paper or business card works as a makeshift spacer
Reassembling and testing the chainsaw
Finally, reassemble by reconnecting all wiring, ensuring no pinched wires exist beneath covers. Reattach the spark plug wire securely, then verify your repair by starting the chainsaw. A smooth-running engine confirms successful coil replacement.
Conclusion
Testing your chainsaw coil at home can save you significant time and money when your saw refuses to start. Most chainsaw failures stem from ignition system problems, which we now know how to diagnose without expensive tools or professional help. The multimeter method proves particularly effective for confirming suspicions about a faulty coil before spending money on replacements.
Remember that a properly functioning ignition coil generates thousands of volts necessary for your chainsaw’s operation. The symptoms we covered – starting problems, weak sparks, and engine misfires – typically point toward coil issues that require attention. After performing the visual inspection and resistance tests outlined above, you’ll know exactly what’s causing your chainsaw troubles.